| View previous topic :: View next topic |
| Author |
Message |
Neology

Joined: 25 May 2011
Posts: 2412
Location: VIC, AU
|
 Posted: Wed May 06, 2020 4:01 am Post subject: How to Open the Core Lid/Cap of Pentium Pro Posted: Wed May 06, 2020 4:01 am Post subject: How to Open the Core Lid/Cap of Pentium Pro |
 |
|
Recently I have received a Penitum Pro with a broken lid. (I know, it is shame)
I would like to remove the lid and fit into foreverfire's show stand for the demonstration purposes.
I have tried to use a hot air gun to blow constantly around the edge of the lid at 400-600°C for about 10 minutes, however, the solder doesn't seem to melt at all.
Can someone ever opened/removed the PPro lid to share some experience?
Many thanks
_________________
Want List
Trade List(Up-to-date)
Last edited by Neology on Wed May 06, 2020 7:11 am; edited 1 time in total |
|
| Back to top |
|
 |
cvandijk
Joined: 21 Jul 2016
Posts: 3589
Location: Netherlands
|
| Posted: Wed May 06, 2020 4:20 am Post subject: |
|
|
| Isn't it better to sell this one and get a non-es to remove the lid? It's still a sample, in a bad shape but still rare. |
|
| Back to top |
|
|
Marcin

Joined: 02 Jan 2005
Posts: 8519
Location: Poland
|
| Posted: Wed May 06, 2020 5:11 am Post subject: |
|
|
Neo, have you tried to prying with long but small flat tip screwdriver in same time of heating ? Max heat and patience and you should done it. PPro have big area and ceramic and huge goldcap is good heatsink. If you have vise/vice then it is good tool to lock it without contact of bottom side with surface.
_________________
Visit ABC CPU - Virtual CPU Museum. |
|
| Back to top |
|
|
Neology
Joined: 25 May 2011
Posts: 2412
Location: VIC, AU
|
| Posted: Wed May 06, 2020 6:10 am Post subject: |
|
|
| Marcin wrote: | | Neo, have you tried to prying with long but small flat tip screwdriver in same time of heating ? Max heat and patience and you should done it. PPro have big area and ceramic and huge goldcap is good heatsink. If you have vise/vice then it is good tool to lock it without contact of bottom side with surface. |
Thanks, Marcin. I've tried to use tweezers to prying the corner during the heating.
I'll try to find some tools to fixed the ppro and try again tomorrow. 
_________________
Want List
Trade List(Up-to-date) |
|
| Back to top |
|
|
pixelmanca

Joined: 03 Oct 2018
Posts: 316
Location: USA
|
| Posted: Wed May 06, 2020 6:37 pm Post subject: |
|
|
I de-lid ceramic chips all of the time and I've already de-lidded a bunch of Pentium Pros in the past and they are fairly easy to de-lid, if you use the correct tools and method...
To ensure that I don't get burned while de-lidding chips, I always wear a pair of heat resistant gloves, because after the chip is heated up, you can get badly burned if you touch it.
The kind of gloves that they sell in order to handle hot grills that you B-B-Q on work well, or you can spend more money and buy a pair of gloves that glass blowers use in order to handle hot molten glass.
I have a pair of those glass blower's gloves and I use them all of the time when de-lidding things and they work great to protect your hands from getting burned.
I use a metal baking pan with short walls all around it as a surface to de-lid chips on and because the heat will travel through the chip and then on through the metal baking pan, I always place the baking pan on a heat resistant surface to work on things.
I place the chip to be de-lidded in a corner of the metal baking pan, in order to "trap" it against 2 sides of the pan, so that it doesn't move around while heating it up.
For Pentium Pro chips, you must heat up the edges of the ceramic lid for 6 minutes, using a heat gun set on 600ºC.
When heating up the ceramic lid, make sure that the heat gun's nozzle is very close to the lid, just slightly higher than the pins on the chip and move the nozzle in a fairly slow and continuous motion all around the edges of the lid while you are heating it up.
After applying 6 minutes of continuous 600ºC heat all around the edges of the lid, set the heat gun down and quickly, so it doesn't cool down, take a pair of tweezers in one hand, while holding the chip in place against the 2 walls of the corner of the metal baking pan, with your other hand that is wearing a heat resistant glove, and then using the tweezers you will be able to flip the lid right off.
If the lid doesn't come right off, quickly use the heat gun again, before the chip cools down, and heat the ceramic lid up for an additional couple of minutes and then you will definitely be able to flip the lid off using the tweezers.
I've de-lidded a bunch of Pentium Pros and I have never had to heat any of them up more than the initial 6 minutes plus maybe an additional couple on minutes for a few of them, when the lid didn't come off after the initial 6 minute heating period.
After you get the lid flipped off, make sure you don't move the chip around any for around 20 - 30 seconds, because Pentium Pro chips use a LOT of solder to attach the lids and if you move the chip around much in the first 20 - 30 seconds after removing the lid, the molten solder will run all over the chip and then harden and be impossible to ever remove.
That happened to me once, when I picked up the chip right after getting the lid to come off, and then I tilted the chip and the hot molten solder ran all over the chip and got stuck in between a bunch of the pins.
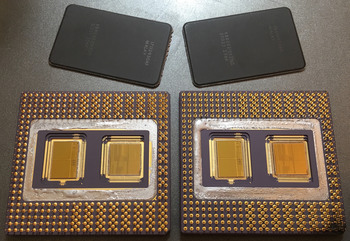
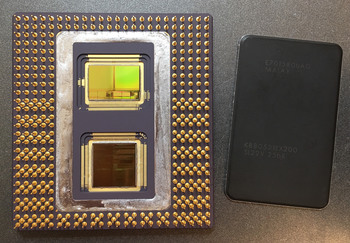
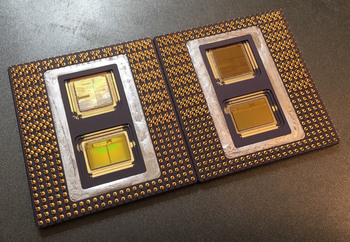
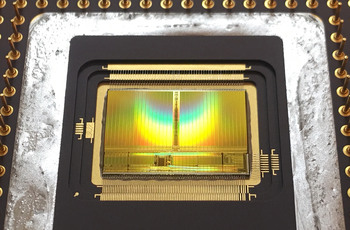
Here's some pictures that show a couple of the Pentium Pro chips that I've de-lidded, the 2 big dies and the die bonding wires are very nice looking underneath the plain and boring lids:
(Click on the pictures to see the high resolution versions.)
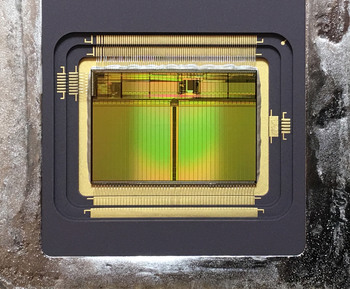
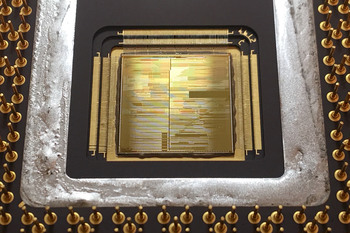
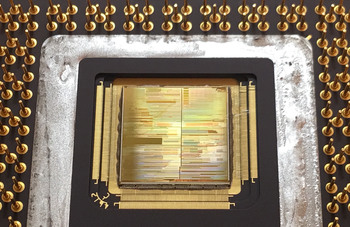
If you have any questions about the de-lidding process for these Pentium Pro chips, or for any other chip as well, please feel free to ask me and I'll do my best to help you out.
_________________
"The error of youth is to believe that intelligence is a substitute for experience,
while the error of age is to believe that experience is a substitute for intelligence"
- Lyman Bryson |
|
| Back to top |
|
|
cuttingedgecs
Joined: 08 Oct 2017
Posts: 1764
Location: Australia
|
| Posted: Wed May 06, 2020 7:18 pm Post subject: |
|
|
| pixelmanca wrote: |
When heating up the ceramic lid, make sure that the heat gun's nozzle is very close to the lid, just slightly higher than the pins on the chip... |
Just a word of warning about using heat guns very close to things. Low and mid priced heat guns don't know how hot they are. They run a certain amount of current to the heating element and fan and assume based on the manufacturer's calculations that this will result in the correct amount of heat coming out the end. If you place a heat gun too close to your work it will limit the flow of air through the gun, and this will result in the air coming out of the gun being hotter than expected. It will also result in the element not being cooled down enough by the limited air flowing past. This can destroy your heat gun, and I have seen this happen.
Even in higher end models which have sensors for this, the gun will simply turn down the current to the element to prevent the heat buildup, and you are no better having the gun closer to your work than further away. Having it further away can heat up more of the piece and mean you don't have to move the gun around as much.
I'd recommend reading your heat gun manual for information about its safety features and how close to the job it recommends you work at various temperature/fan settings. If there isn't any information in the manual, then listen for changes in the sound coming from the blower as you move the gun closer to your work to determine at what point airflow is impeded. |
|
| Back to top |
|
|
rjluna2
Joined: 27 Oct 2014
Posts: 1302
Location: Hiram, GA, USA
|
| Posted: Thu May 07, 2020 7:24 am Post subject: |
|
|
Nice job, pixelmanca  |
|
| Back to top |
|
|
H3nrik V!

Joined: 15 Apr 2014
Posts: 1246
Location: Denmark
|
| Posted: Thu May 07, 2020 7:55 am Post subject: |
|
|
| pixelmanca wrote: | I de-lid ceramic chips all of the time and I've already de-lidded a bunch of Pentium Pros in the past and they are fairly easy to de-lid, if you use the correct tools and method...
Here's some pictures that show a couple of the Pentium Pro chips that I've de-lidded, the 2 big dies and the die bonding wires are very nice looking underneath the plain and boring lids:
(Click on the pictures to see the high resolution versions.)
|
Very fine pictures! Unfortunately my work computer's antivirus software won't let me visit the hosting site .. |
|
| Back to top |
|
|
Neology
Joined: 25 May 2011
Posts: 2412
Location: VIC, AU
|
| Posted: Thu May 07, 2020 9:32 am Post subject: |
|
|
| pixelmanca wrote: |
To ensure that I don't get burned while de-lidding chips, I always wear a pair of heat resistant gloves, because after the chip is heated up, you can get badly burned if you touch it.
The kind of gloves that they sell in order to handle hot grills that you B-B-Q on work well, or you can spend more money and buy a pair of gloves that glass blowers use in order to handle hot molten glass.
I have a pair of those glass blower's gloves and I use them all of the time when de-lidding things and they work great to protect your hands from getting burned. |
Thanks for your advice. It is always good to wear CPEs, including heat resistant gloves and safety goggles.
| pixelmanca wrote: |
I use a metal baking pan with short walls all around it as a surface to de-lid chips on and because the heat will travel through the chip and then on through the metal baking pan, I always place the baking pan on a heat resistant surface to work on things.
I place the chip to be de-lidded in a corner of the metal baking pan, in order to "trap" it against 2 sides of the pan, so that it doesn't move around while heating it up. |
Nice idea, I will try the baking pan. It is a good idea to spread the heat to the Pentium Pro 
| pixelmanca wrote: |
For Pentium Pro chips, you must heat up the edges of the ceramic lid for 6 minutes, using a heat gun set on 600ºC.
When heating up the ceramic lid, make sure that the heat gun's nozzle is very close to the lid, just slightly higher than the pins on the chip and move the nozzle in a fairly slow and continuous motion all around the edges of the lid while you are heating it up.
After applying 6 minutes of continuous 600ºC heat all around the edges of the lid, set the heat gun down and quickly, so it doesn't cool down, take a pair of tweezers in one hand, while holding the chip in place against the 2 walls of the corner of the metal baking pan, with your other hand that is wearing a heat resistant glove, and then using the tweezers you will be able to flip the lid right off.
If the lid doesn't come right off, quickly use the heat gun again, before the chip cools down, and heat the ceramic lid up for an additional couple of minutes and then you will definitely be able to flip the lid off using the tweezers.
I've de-lidded a bunch of Pentium Pros and I have never had to heat any of them up more than the initial 6 minutes plus maybe an additional couple on minutes for a few of them, when the lid didn't come off after the initial 6 minute heating period.
After you get the lid flipped off, make sure you don't move the chip around any for around 20 - 30 seconds, because Pentium Pro chips use a LOT of solder to attach the lids and if you move the chip around much in the first 20 - 30 seconds after removing the lid, the molten solder will run all over the chip and then harden and be impossible to ever remove.
That happened to me once, when I picked up the chip right after getting the lid to come off, and then I tilted the chip and the hot molten solder ran all over the chip and got stuck in between a bunch of the pins.
Here's some pictures that show a couple of the Pentium Pro chips that I've de-lidded, the 2 big dies and the die bonding wires are very nice looking underneath the plain and boring lids
If you have any questions about the de-lidding process for these Pentium Pro chips, or for any other chip as well, please feel free to ask me and I'll do my best to help you out. |
Awsome photos!
This is very helpful tips. I shall try it again over the weekend
Much appreciated!
_________________
Want List
Trade List(Up-to-date)
Last edited by Neology on Thu May 07, 2020 9:56 am; edited 1 time in total |
|
| Back to top |
|
|
Neology
Joined: 25 May 2011
Posts: 2412
Location: VIC, AU
|
| Posted: Thu May 07, 2020 9:52 am Post subject: |
|
|
| cuttingedgecs wrote: | | pixelmanca wrote: |
When heating up the ceramic lid, make sure that the heat gun's nozzle is very close to the lid, just slightly higher than the pins on the chip... |
Just a word of warning about using heat guns very close to things. Low and mid priced heat guns don't know how hot they are. They run a certain amount of current to the heating element and fan and assume based on the manufacturer's calculations that this will result in the correct amount of heat coming out the end. If you place a heat gun too close to your work it will limit the flow of air through the gun, and this will result in the air coming out of the gun being hotter than expected. It will also result in the element not being cooled down enough by the limited air flowing past. This can destroy your heat gun, and I have seen this happen.
Even in higher end models which have sensors for this, the gun will simply turn down the current to the element to prevent the heat buildup, and you are no better having the gun closer to your work than further away. Having it further away can heat up more of the piece and mean you don't have to move the gun around as much.
I'd recommend reading your heat gun manual for information about its safety features and how close to the job it recommends you work at various temperature/fan settings. If there isn't any information in the manual, then listen for changes in the sound coming from the blower as you move the gun closer to your work to determine at what point airflow is impeded. |
Thanks for the advice.
_________________
Want List
Trade List(Up-to-date) |
|
| Back to top |
|
|
pixelmanca
Joined: 03 Oct 2018
Posts: 316
Location: USA
|
| Posted: Thu May 07, 2020 1:19 pm Post subject: |
|
|
| cuttingedgecs wrote: | | pixelmanca wrote: |
When heating up the ceramic lid, make sure that the heat gun's nozzle is very close to the lid, just slightly higher than the pins on the chip... |
Just a word of warning about using heat guns very close to things. Low and mid priced heat guns don't know how hot they are. They run a certain amount of current to the heating element and fan and assume based on the manufacturer's calculations that this will result in the correct amount of heat coming out the end. If you place a heat gun too close to your work it will limit the flow of air through the gun, and this will result in the air coming out of the gun being hotter than expected. It will also result in the element not being cooled down enough by the limited air flowing past. This can destroy your heat gun, and I have seen this happen.
Even in higher end models which have sensors for this, the gun will simply turn down the current to the element to prevent the heat buildup, and you are no better having the gun closer to your work than further away. Having it further away can heat up more of the piece and mean you don't have to move the gun around as much.
I'd recommend reading your heat gun manual for information about its safety features and how close to the job it recommends you work at various temperature/fan settings. If there isn't any information in the manual, then listen for changes in the sound coming from the blower as you move the gun closer to your work to determine at what point airflow is impeded. |
I agree with your assessment and yes, if you use a heat gun in very close proximity to a surface for many long sessions you will shorten the heat gun's life and eventually it will burn out.
But the only way to get lids to come off is to raise the temperature of the ceramic module and the solder bond between the module and the lid to a level where the solder is again molten.
The only way to do that is to use a heat gun set on 600ºC in close proximity to the lid, or else it won't get hot enough to return the solder to a molten state and you won't be able to get the lid to come off.
A propane torch can be used as well, but I find them more dangerous and you also risk over heating things with a propane torch.
You may be be correct in saying that some models of heat guns will adjust their temperature downwards if they detect too much heat present at the element, but the 2 different models that I have are not that way and they are my only experience with heat guns.
When I tried to use them at a greater distance to the surface as you suggest, chips and lids did not get hot enough to turn the solder back to a molten form and I could not get the lids to come off.
But once I started placing the nozzle of the heat gun very close to the lids then I had no problems de-lidding many different kinds of modules.
Heat guns that go up to 600ºC are pretty cheap, a decent one can be had on Amazon for under $30. So if a heat gun burns out after de-lidding 20 or 30 or 40 chips than it will be worth the price of replacement, at least for me.
_________________
"The error of youth is to believe that intelligence is a substitute for experience,
while the error of age is to believe that experience is a substitute for intelligence"
- Lyman Bryson |
|
| Back to top |
|
|
ph4nt0m

Joined: 01 Jan 2018
Posts: 812
Location: Europe
|
| Posted: Thu May 07, 2020 3:30 pm Post subject: |
|
|
It seems Intel used some kind of a non-eutectic solder alloy for these lids. Maybe to match thermal expansion of the ceramics. An industrial temperature controlled heat gun at 300ºC can do the job, but it takes some time.
_________________
My Active Sales
Last edited by ph4nt0m on Thu May 07, 2020 3:33 pm; edited 1 time in total |
|
| Back to top |
|
|
Birdman.

Joined: 13 Nov 2012
Posts: 833
Location: Finland
|
| Posted: Thu May 07, 2020 3:32 pm Post subject: |
|
|
I've opened lids of more than 300 different chips and desoldered lots of chips from boards with one heat gun and it's still working. That heat gun is also less expensive 500ºC model but many years old, so maybe they made better tools back then. The important thing while opening soldered lids of ceramic chips is to catch the time when solder melts and flows for the first time. If I can't push the lid off or at least get some blade or sharpened screwdriver under the lid when that happens, then the lid may get stuck with just some non-flowing solder left to held the lid in place.
I attach chips vertically in vise while I open them to reduce the chance of dropping the lid or splashing solder into the die cavity. That also gives me second chance after rotating the chip if solder flows down to one end of lid without getting the lid off yet. I can try opening the chip again when solder flows back or just try to get some tool among the thick solder layer on the bottom of the lid. Without any flowing solder left the lid gets stuck quite well and quite a lot of prying with sharp tool is needed before the lid lifts with the risk of slipping the tool on the die. |
|
| Back to top |
|
|
Neology
Joined: 25 May 2011
Posts: 2412
Location: VIC, AU
|
| Posted: Fri May 15, 2020 1:41 am Post subject: |
|
|
Hey Folks,
There is some progress made this afternoon.
The die cap had finally opened!! Wow
Firstly thanks for all your tips and they are very helpful.
There were few trials and a bit of effort to get there.
The good news it is open now
The bad news is the Cap has cracked. 
_________________
Want List
Trade List(Up-to-date) |
|
| Back to top |
|
|
debs3759

Joined: 18 Jan 2006
Posts: 9477
Location: Northampton, Divided Kingdom
|
| Posted: Fri May 15, 2020 2:09 am Post subject: |
|
|
Nothing a little super glue and a lot of patience couldn't fix
_________________
My graphics card database can be found at http://www.gpuzoo.com.
I can resist anything except temptation.
Debs |
|
| Back to top |
|
|
|
|
|
|
|
You can post new topics in this forum
You can reply to topics in this forum
You cannot edit your posts in this forum
You cannot delete your posts in this forum
You cannot vote in polls in this forum
You cannot attach files in this forum
You cannot download files in this forum
|
|
Powered by phpBB © 2001 phpBB Group
|

