| View previous topic :: View next topic |
| Author |
Message |
CPUShack

Joined: 16 Jun 2003
Posts: 34259
Location: State of Jefferson, USA
|
 Posted: Thu Oct 10, 2019 3:03 pm Post subject: CPU Shack: 3.3GHz 8-core IBM POWER7 CPUs - Lots More Posted: Thu Oct 10, 2019 3:03 pm Post subject: CPU Shack: 3.3GHz 8-core IBM POWER7 CPUs - Lots More |
 |
|
Here are some nice IBM POWER7 SCM CPUs
this is the POWER7 52Y4173 which is an 8-core 3.3GHz CPU (the previous ones we had on the forum were a 3.1GHz version)
These are made on a 45nm process and have 1.2 billion transistors
Each core gets 256K of L2 cache and 4MB of L3 cache
5x POWER7 SCM 52Y4173 3.3Ghz 8-core $25
_________________
New for 2025! The CPU Shack has a co-processor!
Visit The CPU Shack of microprocessor history and information.
Last edited by CPUShack on Fri Nov 08, 2019 6:24 pm; edited 4 times in total |
|
| Back to top |
|
 |
CPUShack
Joined: 16 Jun 2003
Posts: 34259
Location: State of Jefferson, USA
|
|
| Back to top |
|
|
stevejam

Joined: 30 Dec 2017
Posts: 803
Location: Metaluna aka Bellevue WA
|
| Posted: Thu Oct 10, 2019 3:37 pm Post subject: |
|
|
| One please! |
|
| Back to top |
|
|
crazybubba64

Joined: 03 Jul 2018
Posts: 1371
Location: WI, USA
|
| Posted: Thu Oct 10, 2019 4:14 pm Post subject: |
|
|
I'll take one
_________________
My collection |
|
| Back to top |
|
|
Bator

Joined: 28 Oct 2013
Posts: 1285
Location: Russia / Yakutia & Siberia
|
| Posted: Thu Oct 10, 2019 5:36 pm Post subject: |
|
|
One for me please
_________________
WTB List / Trade List |
|
| Back to top |
|
|
pixelmanca

Joined: 03 Oct 2018
Posts: 316
Location: USA
|
| Posted: Thu Oct 10, 2019 6:27 pm Post subject: |
|
|
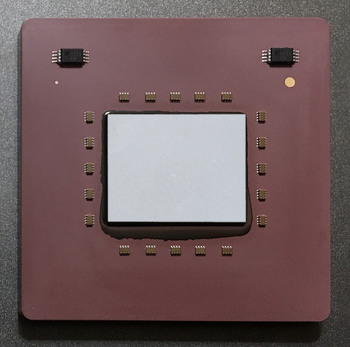
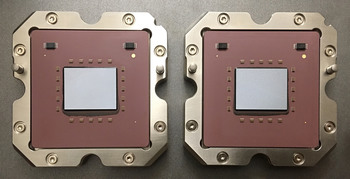
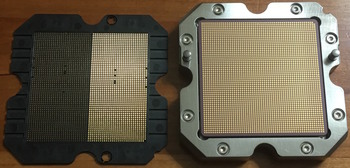
Here's some pictures of what these look like after removing them from their heat spreaders and cleaning the ugly grey silicon glue off of them.
They're fairly plain IBM modules, but they look pretty cool flipped over and displayed in their heat spreaders that way:
(Click on the pictures for the high resolution versions.)
_________________
"The error of youth is to believe that intelligence is a substitute for experience,
while the error of age is to believe that experience is a substitute for intelligence"
- Lyman Bryson |
|
| Back to top |
|
|
karman
Joined: 10 Aug 2017
Posts: 294
Location: Spain
|
| Posted: Thu Oct 10, 2019 7:51 pm Post subject: |
|
|
| One for me please |
|
| Back to top |
|
|
Andreycpu
Joined: 13 Feb 2016
Posts: 1216
Location: Russia
|
| Posted: Thu Oct 10, 2019 11:16 pm Post subject: |
|
|
| one please |
|
| Back to top |
|
|
cooperalp
Joined: 14 Feb 2009
Posts: 688
Location: Alberta
|
| Posted: Fri Oct 11, 2019 12:25 am Post subject: |
|
|
| will take one if any left |
|
| Back to top |
|
|
CPUShack
Joined: 16 Jun 2003
Posts: 34259
Location: State of Jefferson, USA
|
|
| Back to top |
|
|
davids
Joined: 05 Jul 2013
Posts: 78
Location: United States
|
| Posted: Fri Oct 11, 2019 4:36 pm Post subject: |
|
|
| I'll take one if you have! |
|
| Back to top |
|
|
toor
Joined: 02 Feb 2016
Posts: 2
|
| Posted: Sat Oct 12, 2019 1:09 am Post subject: |
|
|
| Whats the best way to remove the heat spreader? |
|
| Back to top |
|
|
pixelmanca
Joined: 03 Oct 2018
Posts: 316
Location: USA
|
| Posted: Sat Oct 12, 2019 3:13 am Post subject: |
|
|
To remove the ceramic module from its metal heat spreader you will need the following things:
A heat gun capable of 600C
A long razor blade
A heat resistant surface
Heat resistant gloves
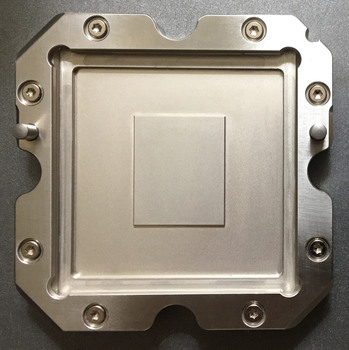
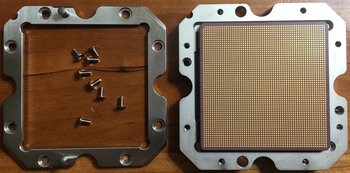
Power 7 SCMs look like this when complete:
(Click on the pictures for the high resolution versions. )
First remove the top frame from the unit by taking out all of the screws:
Then locate the side that has the largest gap between the metal heat spreader and the ceramic module. Like this gap between the ceramic module and the heat spreader on a Power 5 MCM that I recently removed using the exact same technique I'm describing here:
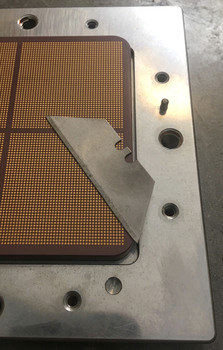
You will be using the razor blade in the largest gap as a sort of pry bar after the unit is heated up, so remember which side the largest gap is on. If there's any visible excess silicon glue in any of the gaps on any sides of the unit, scrape it all out before you heat the module up.
In a slow and constant motion, heat up the top edges of the ceramic module, with the heat gun set on 600C for about 5 minutes, making sure that the nozzle of the heat gun is very close to the ceramic plate the entire time.
After you've heated the module up, use your hand that's protected by the heat resistant glove and hold the module down to the surface its on and with the other hand place the razor blade into the largest gap, so that the sharp edge is slightly underneath the edge of the ceramic plate, like this:
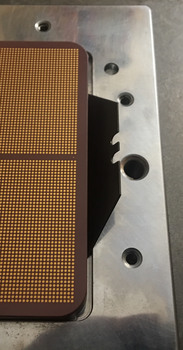
Then just push down, fairly hard, on the right side of the razor blade and doing that will "pop", or release, the glue seal on that side of the ceramic module and on the glue seals on the tops of the 2 adjacent sides as well.
If it feels like you are having to push down too hard and nothing is happening, just heat up the module for a few more minutes and than it will work.
After you've "popped" the seal, let the entire unit cool down for a few minutes and then you can remove the ceramic module from the heat spreader with your gloved hand, to avoiding getting burned, since it will still be kind of hot.
You will have to use a little force when pulling the ceramic module off of the neat spreader, because some of the silicon glue is still attached towards the opposite side of where you used the razor blade as a pry bar.
Once you remove the ceramic module, place it LGA contact side down onto the heat resistant surface and immediately use the razor blade to scrape off as much of the silicon glue as you can while the ceramic and the glue is still warm. It's easier to scrape off the silicon glue when everything is still warm rather than after it's totally cooled down.
After you scrape off as much of the silicon glue as you can with the razor blade, just use some ceramic polish to finish cleaning off the residue that the silicon glue will definitely leave on the ceramic.
Then just polish up the metal frame with some metal polish, replace the top plate on the heat spreader and screw it back on and now you have a nicely polished "frame" to sit the ceramic SCM module back into, if you want them to look like the examples I posted a picture of a few posts above this one.
The method that I just described works on any and all IBM modules that are constructed in the same fashion and I've used this technique to remove Power 4 MCM ceramic modules and Power 5 MCM ceramic modules from their big heat spreaders and Power 6 MCMs are constructed the exact same way as these Power 7 SCMs and this removal method works on them as well.
You will have to increase the heating time on the larger MCM's, for instance the Power 5 MCM took 18 minutes of heating before I could remove the ceramic module from the heat spreader using this technique.
If anyone has any questions about how to do any of this, please feel free to ask me here or PM me and I'll be happy to answer your questions.
_________________
"The error of youth is to believe that intelligence is a substitute for experience,
while the error of age is to believe that experience is a substitute for intelligence"
- Lyman Bryson
Last edited by pixelmanca on Fri Jul 23, 2021 10:53 am; edited 14 times in total |
|
| Back to top |
|
|
CPUShack
Joined: 16 Jun 2003
Posts: 34259
Location: State of Jefferson, USA
|
|
| Back to top |
|
|
karman
Joined: 10 Aug 2017
Posts: 294
Location: Spain
|
| Posted: Sat Oct 12, 2019 9:45 pm Post subject: |
|
|
| pixelmanca wrote: | Here's some pictures of what these look like after removing them from their heat spreaders and cleaning the ugly grey silicon glue off of them.
They're fairly plain IBM modules, but they look pretty cool flipped over and displayed in their heat spreaders that way:
(Click on the pictures for the high resolution versions.)
|
Unfortunally I just relalized by the photos that these ones lacks the frame and the screws  |
|
| Back to top |
|
|
|

